


The holiday season brings a special kind of magic, especially when enjoyed with loved ones. And what could be more magical than a mug of steaming hot chocolate that unveils a delightful surprise? Our Christmas Chocolate Hot Cups aren’t just a drink; they’re an interactive treat that will bring smiles to every family member, big and small. Imagine the excitement as your children pour warm milk over a chocolate shell, watching it melt away to reveal a treasure trove of cocoa and marshmallows! These are truly some of the easiest Christmas treats to make, perfect for busy parents looking for fun holiday activities with their kids. Whether you’re making them for a cozy family movie night, preparing charming edible gifts, or simply want to add an extra sprinkle of joy to your holiday spread, these hot cups are a must-try. They embody the heartwarming spirit of family Christmas recipes, making traditions even sweeter. Get ready to create cherished holiday moments and delicious memories that will last a lifetime!
Equipment Needed
- Silicone sphere molds (or muffin liners for a less ‘cup’ shape)
- Microwave-safe bowls
- Spoon or pastry brush
- Small saucepan
- Mugs
Ingredients
- 12 oz good quality melting chocolate (milk, dark, or white)
- 1 cup hot chocolate mix (your favorite brand)
- 1 cup mini marshmallows
- Optional: Sprinkles
- Optional: Crushed candy canes
- Optional: Chocolate drizzle
- Optional: Cocoa powder
- Optional: Cinnamon stick for garnish
Shopping List
- Pantry: 12 oz melting chocolate (milk, dark, or white), 1 cup hot chocolate mix, 1 cup mini marshmallows
- Baking & Decorating: Sprinkles (optional), crushed candy canes (optional)
- Spices: Cocoa powder (optional), cinnamon sticks (optional)
Instructions
- Melt the chocolate: Place melting chocolate in a microwave-safe bowl. Microwave in 30-second intervals, stirring after each, until smooth and fully melted. Alternatively, use a double boiler.
- Coat the molds: Spoon a small amount of melted chocolate into each cavity of your silicone sphere mold. Using the back of the spoon or a pastry brush, spread the chocolate evenly up the sides of the mold, ensuring no thin spots. Repeat for all cavities, making sure to create at least two halves per hot cup. For a ‘cup’ shape, you only need one half per cup, but ensure the rim is thick enough.
- Chill: Place the molds in the refrigerator for 10-15 minutes, or until the chocolate is firm and easily releases from the mold.
- Assemble the cups: Carefully remove the chocolate halves from the molds. Fill half of your chocolate shells with 2 tablespoons of hot chocolate mix and a generous handful of mini marshmallows. Add any desired sprinkles or crushed candy canes.
- Seal the cups: Warm a clean, empty plate or a flat pan in the microwave for a few seconds. Take an empty chocolate half and gently press its rim onto the warm plate for a second or two to slightly melt the edge. Immediately press this warmed edge onto the filled chocolate half to create a sealed sphere or cup. If making a ‘hot cup’ where you only use one half, ensure the rim is sturdy.
- Decorate (optional): Drizzle with extra melted chocolate, sprinkle with more festive decorations, or dust with cocoa powder. Let them set completely.
Tips & Variations
- Chocolate Quality Matters: For the best taste and easiest melting/setting, especially when making with little helpers, use high-quality melting chocolate or chocolate wafers specifically designed for candy making. This ensures a smooth finish every time!
- Kid-Friendly Fun: Get the kids involved in spreading the chocolate into the molds (they love a little mess!), filling the cups with marshmallows, and decorating. It’s a wonderful holiday activity that creates lasting memories.
- Creative Family Fillings: Beyond marshmallows, consider adding a pinch of cinnamon, a tiny candy cane piece, or even a mini chocolate chip for extra flavor. For a grown-up twist, a tiny splash of espresso powder can deepen the chocolate flavor.
- Easy Sealing Trick: If sealing spheres feels tricky, don’t worry! You can also just create single chocolate ‘bowls’ or ‘cups’ and simply fill them, allowing the hot milk to melt the bottom. Still just as delicious and less fuss!
- Storage for Holiday Prep: These hot cups are fantastic for making ahead! Store your finished creations in an airtight container in a cool, dry place. They’ll be ready for a spontaneous hot chocolate moment or last through all your holiday gifting.
Serving & Storage Suggestions
Picture this: your family gathered around, a chill in the air, and everyone eagerly anticipating their warm mug. Serve these enchanting Christmas Chocolate Hot Cups nestled in your favorite festive mugs, accompanied by a steaming carafe of hot milk. The real joy comes from watching the chocolate shell melt away, revealing the delicious surprise within! Elevate the experience with a dollop of whipped cream, a dusting of cocoa powder, extra sprinkles, or a peppermint stick for stirring. They’re not just a drink; they’re an experience your family will adore. These also make incredibly thoughtful edible gifts for teachers, neighbors, or friends – simply package them in clear bags with a ribbon. Leftovers? Unlikely! But if you do have any, store them in an airtight container at room temperature for up to two weeks, ready for another cozy family moment.
I truly hope these magical Christmas Chocolate Hot Cups bring extra warmth, joy, and delicious family moments to your holiday season! They’re such a fun project to make together and a treat everyone will cherish. If your family tries this recipe, please share your experiences and favorite fillings in the comments below – we’d absolutely love to hear about your holiday creations! Happy baking and happy family moments! #ChristmasTreatsRecipesEasy #ChristmasFoodIdeasRecipes #ChocolateChristmasRecipes #EasyChristmasTreatsToSell #FallGoodiesDessertRecipes #TreatsChristmas #XmasSweetsGiftIdeas #ChristmasHotChocolateIdeas #WhatToMakeForChristmas
Family Favorite Easy Christmas Chocolate Hot Cups Treats
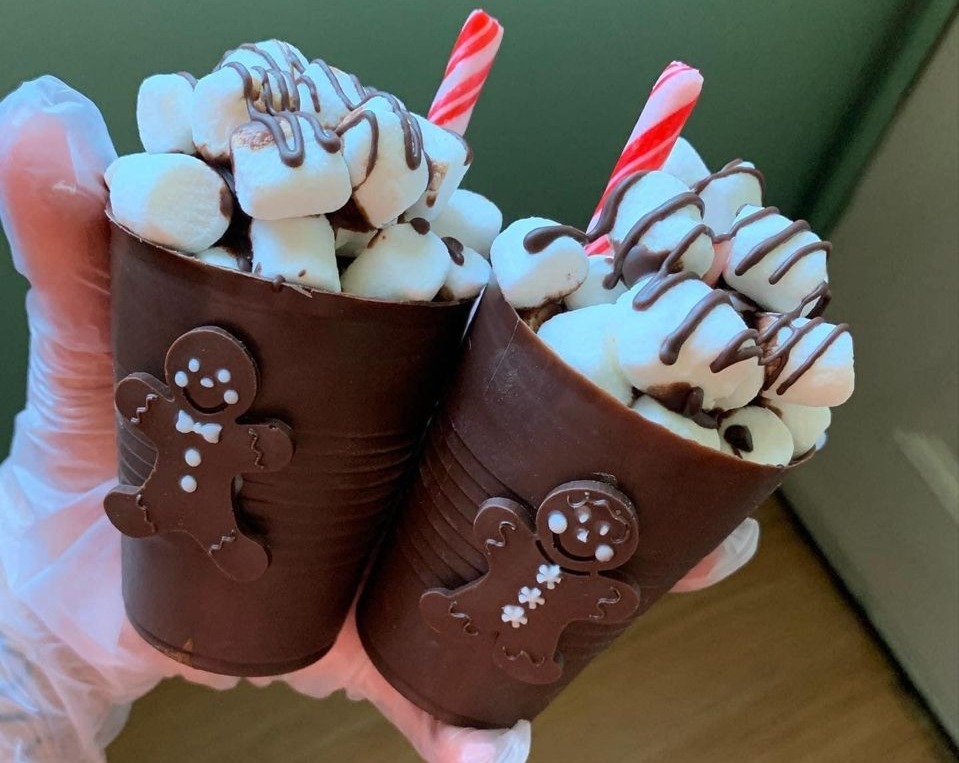
Whip up these delightful, easy Christmas Chocolate Hot Cups – perfect for creating warm family memories, gifting, or a cozy fireside treat that transforms into rich hot chocolate.
Ingredients
- 12 oz good quality melting chocolate (milk, dark, or white)
- 1 cup hot chocolate mix (your favorite brand)
- 1 cup mini marshmallows
- Optional: Sprinkles
- Optional: Crushed candy canes
- Optional: Chocolate drizzle
- Optional: Cocoa powder
- Optional: Cinnamon stick for garnish
Instructions
- Melt the chocolate: Place melting chocolate in a microwave-safe bowl. Microwave in 30-second intervals, stirring after each, until smooth and fully melted. Alternatively, use a double boiler.
- Coat the molds: Spoon a small amount of melted chocolate into each cavity of your silicone sphere mold. Using the back of the spoon or a pastry brush, spread the chocolate evenly up the sides of the mold, ensuring no thin spots. Repeat for all cavities, making sure to create at least two halves per hot cup. For a 'cup' shape, you only need one half per cup, but ensure the rim is thick enough.
- Chill: Place the molds in the refrigerator for 10-15 minutes, or until the chocolate is firm and easily releases from the mold.
- Assemble the cups: Carefully remove the chocolate halves from the molds. Fill half of your chocolate shells with 2 tablespoons of hot chocolate mix and a generous handful of mini marshmallows. Add any desired sprinkles or crushed candy canes.
- Seal the cups: Warm a clean, empty plate or a flat pan in the microwave for a few seconds. Take an empty chocolate half and gently press its rim onto the warm plate for a second or two to slightly melt the edge. Immediately press this warmed edge onto the filled chocolate half to create a sealed sphere or cup. If making a 'hot cup' where you only use one half, ensure the rim is sturdy.
- Decorate (optional): Drizzle with extra melted chocolate, sprinkle with more festive decorations, or dust with cocoa powder. Let them set completely.
